The following guide will show you how to assemble a corner base unit. Although our units come pre assembled, if you request a dry unit assembly and have to take the unit apart to get it inside your home then this guide will be useful to reassemble it again.
 Parts supplied:
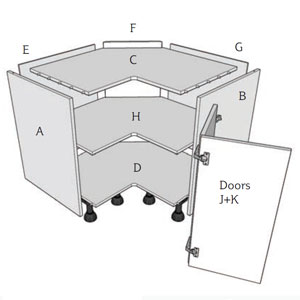
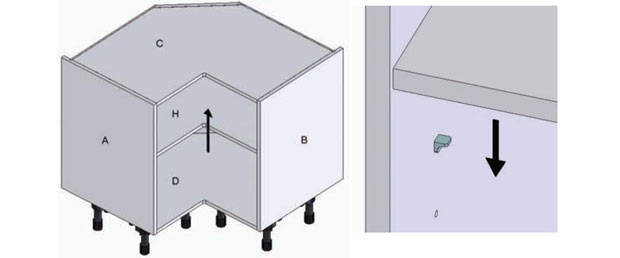
A – Left hand end panel
B – Right hand end panel
C – Top panel
D – Base panel with legs attached
E – Left hand back panel
F – Diagonal rear back panel
G – Right hand back panel
H – Shelf panel
J – Door double hinged
K – Door single hinged
Lay left hand end panel “A” flat apply glue to dowel and insert top and base panels “C” & “D”, ensuring that dowels fully enter holes. Apply glue to dowel holes in right hand end holes “B” and push into place, ensure that dowels fully enter holes.
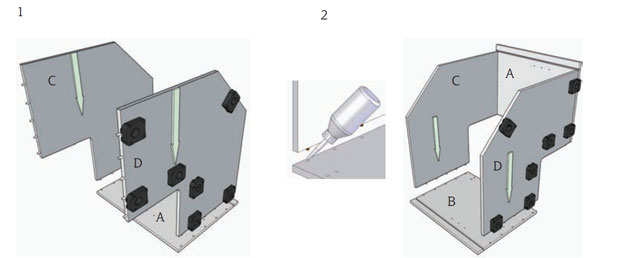
Lay unit onto its front edges (ensuring that front edges are protected). Fit corner shelf panel “H” into place through back space. Position rear angled back panel “F” and screw fix to back edges of top and base panels “C” & “D” (ensure that all edges are aligned).
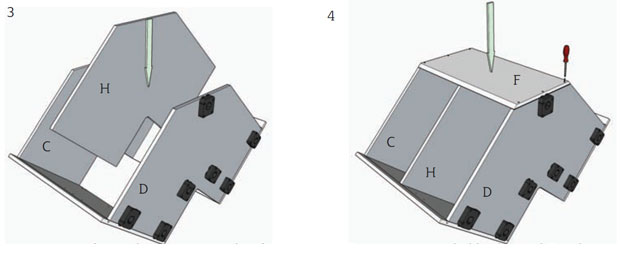
Slide back panel “G” into place locating in the groove in side panel. Slide back panel E into place locating in the groove in side panel “A”.
Drill pilot holes through back panels “E” & “G” and screw to rear edges of top and base panels “C” & “D”. Carefully drill pilot holes through sides of back panels “E” & “G”.

Screw fix into the diagonal edges of the rear back panel “F”. Use only short screws to avoid screwing through the diagonal edge. Fit legs on base panel “D”.

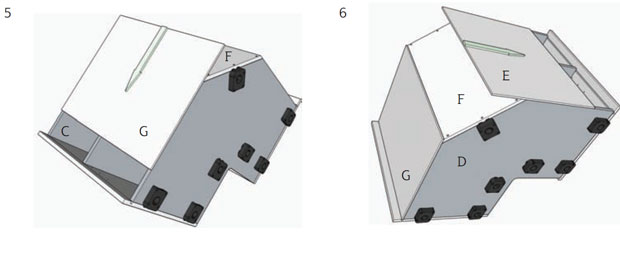
Stand unit upright and lift shelf “H” upwards. Insert shelf supports into holes in end panels “A” & “B” and rear diagonal back panel F, then lower shelf onto supports.
Door fitting: double hinged doors
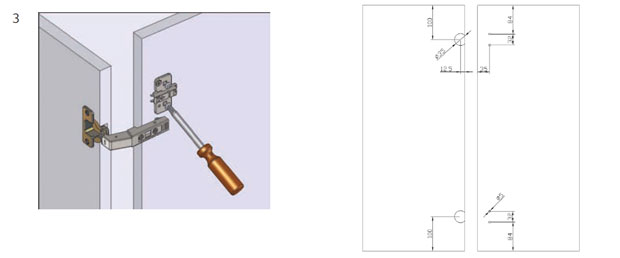
Clip 165 degree hinges onto hinge plates on either left or right hand end panel. Secure the hinge cups to holes in rear of the door with screws shown Fit corner door hinges to rear of corner doors. Secure hinge cups to holes in rear of door as shown.

Drill rear of the second door for hinge plates as shown and screw fix.
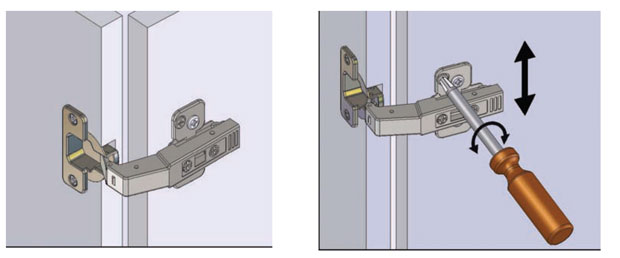
Clip hinges to the plates on the rear of the second door. For hinge adjustment see the hinge fitting page. Note: – the hinge plates on the second door can be adjusted vertically by turning the plate screw as shown.
Download our mobile app
Looking for some kitchen inspiration? Take a look at some of our real customer kitchens, video reviews as well as advice in our mobile app. We’ll also keep you up to date with any new ranges and offers that we have available.
Up to 50% off competitor kitchen prices
At DIY Kitchens, not only do you get a quality rigid built kitchen but you also get it at a fabulous price too! Price your kitchen up on our site and you could see savings of up to 50% off other kitchen quotes that you’ve had.
Take a look at our kitchen price comparison page here.
Real customer kitchens
Get some inspiration for designing your own new kitchen with over 3,000 pictures of our customers’ kitchens that they ordered from us.
Hi. I am in the process of adding units to my shopping basket and I require the 900X900mm Highline Corner Base Unit With Shelf – For Standard Doors for the Stanbury white kitchen. There are 5 different units listed, all with different codes but seem to have the same spec (and are all the same price). Can you tell me what the differences are? FD99-PWS, FD99-1, FD99-2, FD99-HL-MULTI and FD99-ULT. Thanks.
Hi Janice, we do apologise for the confusion, there is no difference between those units. I have requested for this to be amended on our website, as the product code is the only thing that has been updated, the unit has not changed.
Hi, If installing corner base units I take it that no corner post will be required?
Thanks
Hi, if using an L-shaped corner base unit then no corner post is required.
Is there any tolerance between the back panel and the wall on a 900 x 900 corner unit?
Regards
Tony
Hi Tony, there is a 42mm service void at the back. Here is a picture of one that has just been installed in my kitchen.
Many thanks for the reply, I am fitting 2 corner units with a 300 in the middle and it was a bit tight but this resolves my problem
Cheers
T
By dry assembled do you mean you have to take each unit apart on delivery and glue them or are they serviceable to install dry?
Hi, dry assembled means that each unit is assembled but without glue. This allows you to take the unit apart, to fit into your house if there are access restrictions or you can adapt it on site and then glue it together once complete.
I notice that you now pre drill and attach all doors and hinges as standard. If I was to ask for a dry fit of L corner unit, would doors and hinges still bee put on by you?
Hi,
Yes, we still fit doors and hinges with a dry assembled unit. All dry assembled refers to is that there is no glue holding the unit together, just screws and the dowels so that you can easily take it apart and reassemble again. With regards to the doors, they clip on and off in a matter of seconds.