


If you’re lucky enough to have an open kitchen area then you may find yourself having a bit of space to fill. The most common solution to this dilemma is to have a DIY kitchen island built and installed. This solution gives loads more kitchen storage and workspace and adds an attractive feature to your room.

Many people think that the DIY kitchen island is one big unit that looks quite complex to design and construct, but that is not the case!
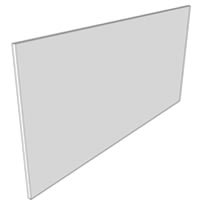
The image below shows an example of a completed modern Carrera Gloss kitchen island. The rest of this article will talk about this kitchen island and how it is constructed.
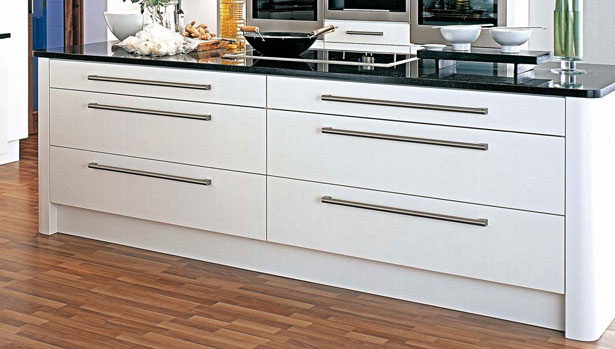
Carrera Gloss kitchen island dimensions
- The width of this kitchen island (without worktop) is 2200mm (220cm)
- The height of this kitchen island (without worktop) is 720mm from the workable kitchen units and 150mm for the unit legs = 890mm (89cm)
- The depth of this kitchen island (front to back – without worktop) is 560mm + 20mm draw fronts + 20mm backpanel = 600mm (60cm)
- Total dimensions of the kitchen island without worktop = 89cm x 220cm x 60cm
- The size of the kitchen island worktop will be 40mm wider than the width and 40mm deeper than the depth of the kitchen island to give you some worktop overhang. So the size of the worktop needed for this Carrera Gloss kitchen island example would need to be 224cm x 64cm.
Components that make up the Carrera Gloss island
The Carrera Gloss island is made up of the following components:
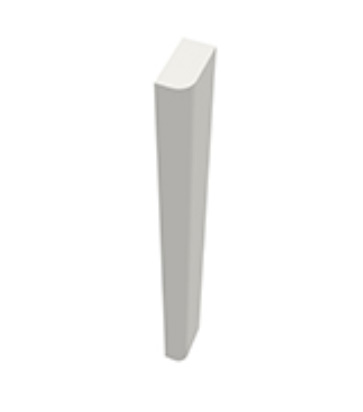

4 x White Base Radius Feature Ends
These are used to give a nice smooth curve to all 4 corners of the Carrera Gloss kitchen island. The height of these feature ends is 890mm (89cm). That is the distance from the floor to the top of the kitchen units that make up the island.
Pan Drawer Units
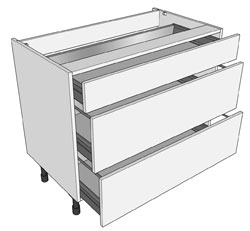
The 2 1000mm wide units are attached together to build the kitchen island up. If you need a wider kitchen island then you could have some reduced depth units on the back to give the kitchen island some more depth. With regards to the number of drawers, you could change this if you liked to 1 or 2 pan drawers and up to 3 smaller drawers in one kitchen unit. The handles are also down to you, simply choose the ones you like the look of that match the island and the other units in your kitchen.
Plinth

Base End Panels
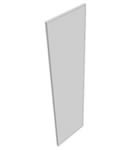
The sides of your kitchen island will now need some end panels that slot into the feature end posts to give you a smooth finish on the sides. These may need cutting down slightly to fit into the gap left between the end posts.
Back Panel
To tidy up the back of the kitchen island, you are going to need a back panel to complete it. This can be ordered to match the length that you need. Back panels can be ordered on the DIY Kitchens website by choosing the length that you need from the selection box on the page. All end panels are by default 900mm (90cm) high. The maximum length that back panels are to is 2000mm (200cm)
Utilising the kitchen island

If you are going to use your kitchen island to hold a sink then you may need some serious piping work doing to get water to the island. If you are going to use it for an electric hob then you are going to need some plug sockets. The hob would be permanently plug in, so your kitchen fitter/electrician would need to place a socket somewhere inside the island but if you would like some additional plug sockets then you can have some that pop straight out of the kitchen island. See an example Sensio Popup Socket here.

Want to plan your kitchen island and create a paper plan mock-up? Simply download the Kitchen Planner PDFs here and start measuring up and slotting units into position.
You can start buying kitchen island units here
Kitchen island worktops
Once you have your kitchen island planned, you’ll then need decide on the worktop that you are going to use. Will you use a laminate worktop or a shiny solid granite worktop?
Click here to learn more about which worktop is right for you.
Island Examples

Up to 50% off competitor kitchen prices
At DIY Kitchens, not only do you get a quality rigid built kitchen but you also get it at a fabulous price too! Price your kitchen up on our site and you could see savings of up to 50% off other kitchen quotes that you’ve had.
Take a look at our kitchen price comparison page here.
Real customer kitchens
Get some inspiration for designing your own new kitchen with over 4,000 pictures of our customers’ kitchens that they ordered from us.
