


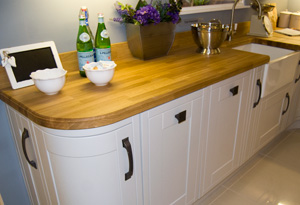
Wooden worktops differ a little to laminate and granite as they need a little more love and attention. Don’t get me wrong, wooden worktops are fabulous but as with all great things they do require a little maintenance to keep them in tip top condition.
Wooden worktop preparation
Before you install your worktop for the first time, it is recommended that you oil it about 4 times with some protective wood oil. As each thin coat of oil is absorbed and dries, rinse and repeat until complete. Any cut outs in the worktop like sinks, tap holes and the ends need more attention to ensure they are water tight, as these sections will have bare wood showing, so they will need more layers of oil than the top surface.
One thing to remember is that oiling your worktop will not make it shiny like a gloss kitchen door, it is purely giving your worktop a waterproof coating and to keep it looking great!
Ongoing maintenance
Once your worktop is fitted, it is recommended that you oil it about 3 times a year. You’ll be able to visibly see if it needs any additional oiling during the year.
In order to ensure that your wooden worktop stays in tip condition, please look at the points below. Remember, prevention is always better than the cure.
- Don’t use chemical cleaners on the worktops.
- If water is dropped on the worktop and water beads are left on the surface then your worktop is still waterproof. If it starts to get absorbed or no beads form then it’s time for another oiling session!
- If you want to clean your wooden worktop then use some washing up liquid and a little warm water and quickly wipe it dry.
- Use a T-shirt or lint free cloth to oil your wooden worktop.
- Quite an obvious one but use a chopping board for cutting food.
- Don’t place hot pans onto wooden worktops. The best option is to get a granite chopping board. They are pretty solid & will handle the heat well.

Sanding your wooden worktop
After a few years of usage, your worktop may have a couple of “features”, i.e. marks, stains or burns but, this is not the end of the world. With wooden worktops, you are able to sand them down to get a nice clean looking surface again.
To sand your worktop down, you’ll need to get yourself a selection of sandpaper, a sanding block or an orbital sander. You will need to start off with around 150 grit sandpaper to get any worktop blemishes out then use a finer sandpaper near the end of the sanding, around 350-400 grit to get a smooth finish. Any scratches that came from using the 150 grit sandpaper will be rubbed out with the finer sandpaper. It is also advisable to keep a vacuum cleaner close to hand to suck up all the dust created.
Remember, when sanding down your wooden worktops, always sand along the grain of the worktop to prevent any unnecessary scratches that will be hard to remove.
Wooden worktop oils
Most wooden worktop oils are made from vegetable oils. As there are a few different types of oils out there, here is a short list of some of the most common ones.
Danish Oil – Easiest to use – mixture of oils and dries quickly and leaves a gleaming satin finish. Favoured by many.
Teak oil – Natural, extracted from vegetable and dries quickly and will leave a slight sheen.
Tung oil – Thicker oil that takes much longer to dry but leaves a solid finish. Some say that this oil, which originated in China, is the best one to use!
Linseed oil – This oil is taken from the seeds of the flax plant. The oil is usually boiled so that it becomes thinner and easier to apply. It also dries quicker too. Linseed oil is also edible!
Download our mobile app
Looking for some kitchen inspiration? Take a look at some of our real customer kitchens, video reviews as well as advice in our mobile app. We’ll also keep you up to date with any new ranges and offers that we have available.

Up to 50% off competitor kitchen prices
At DIY Kitchens, not only do you get a quality rigid built kitchen but you also get it at a fabulous price too! Price your kitchen up on our site and you could see savings of up to 50% off other kitchen quotes that you’ve had.
Take a look at our kitchen price comparison page here.
Real customer kitchens
Get some inspiration for designing your own new kitchen with over 3,000 pictures of our customers’ kitchens that they ordered from us.
