Voice technology has really taken off in recent years and if you happen to own an Amazon Echo then you can really put it to good use in your kitchen, with the help of some  smart devices that allow you to activate them with your voice!
As well as voice activation, you can even create schedules for when smart devices should be switched on/off and access them from anywhere in the world, right from your phone!
What can be voice activated in my kitchen?
Well, the first thing you need to think about is what you would like to activate in your kitchen with the power of just your voice! You need to think rationally here, as you can voice control many things but having your kitchen automatically mopped by a wireless robot, is not that easy yet 😊.

So, some of the most popular things that you may choose to activate in your kitchen, with smart devices and your voice are:
- Ceiling bulbs
- Hob extraction & lighting
- Kettle
- Electric slow cooker
- Electric/induction hob
- Plinth LED lighting
- Under wall unit lighting
- Electric heaters
- Table Lamps
How do I talk to my kitchen?
 The easiest way I’ve found for doing this is with the Amazon Echo but you need a few other gadgets first, that allow you to start voice activating items in your kitchen. The important smart devices that you will need to connect to the items on the above list are:
There are many companies out there, selling smart devices but after some research I chose to use the Tapo devices. This was mainly because I liked the look of the website and Tapo are also part of TP-Link, who make many computer networking products, so they know what they are doing!
During the writing of this article I tried to include colour changing bulbs (Not Tapo devices as they are not available from them yet). The bulbs had to be returned back to Amazon, as 2 separate bulbs would not even connect to the Smart Life/Tuya apps as recommended. Other buyers seemed to have had the same problem too, with no solution.
The installation process for the returned devices was not the easiest either, having to turn your light switch on for 10 seconds then off for 2 seconds, then on for two second then off for 1 second the on for 2 seconds, then off, then back on and wait 5 seconds for the bulb to enter pairing mode! No thanks. I’ll wait for Tapo to release some, I’m never going through that again!
Setting up your smart devices
The best way to show these items being setup in a kitchen, is to use them in some practical scenarios.
Please note that setting these devices up is done using Bluetooth, so please ensure that this is turned on and you are standing close to the devices when first configuring them.
Scenario #1 – Using a smart plug to turn on LED lights

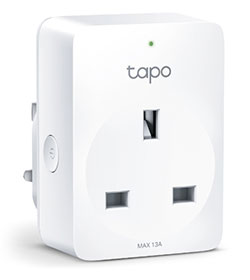
This scenario assumes that you are using a Tapo smart plug (P100) and your LED lights are plugged into a socket, usually hidden away under the units. If you do not feel comfortable doing any of this then please consult with your kitchen fitter or electrician first. If you are going to have lights under your wall units then it is advisable to use lighting pelmet in your kitchen, to hide any LED strips and wires. You can see our range of lighting products here.
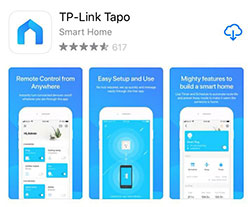 Step #1 – Download the Tapo application onto your phone.
Step #2 – Create an account with Tapo and login.
Step #3 – Unplug the plug that gives your LED lights the power.
Step #4 – Place the Wi-Fi smart plug into the socket and plug your LED’s plug into it.
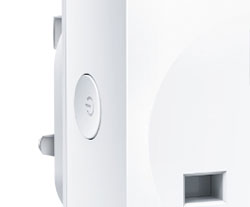 Step #5 – Press the round power button on the side of the smart plug, as shown in the image on the right.
Step #6 – Now click on the + symbol in the top right-hand corner of the Tap app and choose ‘Smart Plug P100’ from the list and proceed to install the device. You will need to put in your wireless network details when asked, to connect the device to your home network (basically you are just connecting to your router).
Step #7 – When prompted, you’ll be asked to give the device a name and location (kitchen, lounge etc.). The name here is very important, as this will be the name you use/speak, to turn the device on or off (it can be changed though, any time you like and as often as you like).
 ADVICE – You could give all your devices friendly names. The lights under the wall units in our house are now called sparkles😊. One-word commands are best, as they are easy to say and remember.
Step #8 – Now, open the Amazon Alexa app on your phone that controls your Echo device.
Step #9 – Click on ‘Devices’ at the bottom of the screen then click on the + symbol in the top right hand corner.
Step #10 – Now click ‘Add Device’, choose ‘Plug’ from the icons listed then click on the ‘Tapo’ option and connect Tapo with the Amazon Alexa app.
Step #11 – Now press the ‘Discover Devices’ button. After about 45 seconds, your smart plug socket will be shown.
Now do this for any other smart plugs that you have in your house.
Scenario #2 – Using a smart light bulb in your kitchen
This scenario assumes that you are using a Tapo light bulb (L510) and the light fitting in your ceiling uses a light bulb with a bayonet or screw in light bulb. Please ensure that the current light is turned off and has cooled down before replacing it.

Step #1 – Place your smart light bulb into the fixing in your ceiling. Please ensure that you order the correct bulb, as some bulbs have a bayonet cap and others have a screw cap. Now turn the power on to the bulb.
Step #2 – Open the Tapo app that you installed in the previous scenario, click on the + symbol in the top right-hand corner of the app and choose ‘Smart Bulb’ from the list and proceed to install the device.
Step #3 – The installation of this device is a little different as you must click on it, when it is listed as a wireless device on your phone. You will also need to put in your wireless network details in when asked, to connect the device to your home network (basically you are just connecting to your router).
Step #4 – When prompted, you’ll also need to give this smart bulb a friendly name and a location.
Step #5 – Your Amazon Alexa app may now pick this device up automatically, if not, refer to Step #8 above and choose ‘Add Device’ then ‘Light’ from the icons listed then click on the ‘Tapo’ option.
Now the fun bit!
 Now that your smart devices are all setup and ready to go, to active them simple say ‘Alexa (or the word you use to activate it)’, and say turn on ‘{Your Device Name}’. As mentioned above, I would say ‘Alexa, turn on sparkles’ to get the under-unit lighting to turn on. It really is as simple as that!
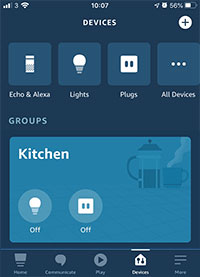
If you click on the + symbol in the Amazon Alex app and create a group called ‘Kitchen’, then you can group together all the devices that you have in your kitchen. You can then turn off all the devices in the kitchen by saying ‘Alexa, turn off kitchen’.
The other great advantage of using your Amazon Echo in the kitchen is that you can set reminders, ask for conversions to try and figure out what a cup measurements actually is, when weighing ingredients! And, if you’re on a diet and looking for the amount of calories in a certain food then just ask Alexa and the answer comes back in seconds!
Also, when you run out of food items during the week that you need to order again on the next big shop, just say ‘Alexa, add eggs to the shopping list’ and keep doing this all week. At the end of the week when you are ready to do your shopping, open the Alex app on your phone, go to ‘More’ then ‘Lists & Notes’ and then click on ‘Shopping’. Everything that you have told Alexa, will be shown. Now there is no excuse to ever forget anything, again!
Other features of smart devices in your kitchen
As well as using your voice to activate your smart home devices, through your Amazon Echo, you can also use the Tapo app, in the following ways.
Set a schedule
Go to each of the smart devices in the app and set a schedule. This could be to turn the lights and kettle on each morning, 5 minutes before you get downstairs.
My Actions
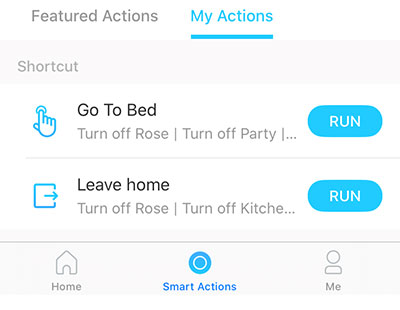
In the Tapo app, you can create some smart ‘My Actions’ like ‘Go To Bed’ and add a task for each item that you want to turn off. Very handy if you’re in bed and have forgotten to turn something off. With one click in the app, you can turn off all the devices that you have connected. You can also perform a similar task in the Amazon Alexa app, by setting up groups for devices and giving them an appropriate name.
Countdown timer
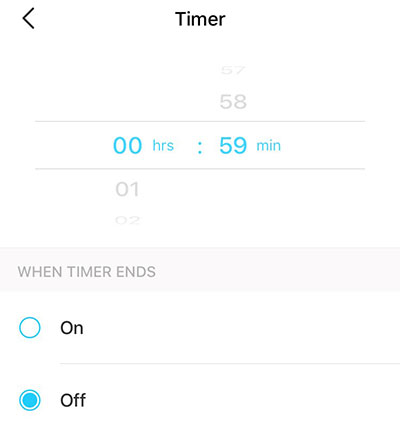
If you’re on your way out the house and need the slow cooker turning off in 60 minutes then just set a countdown timer to do it.
Christmas lights
When you put your Christmas lights up outside, you can set a timer for them to come on, just as you get home from work. You can also time them to go off at a certain point each night, so that you don’t forget and leave them on, much to the annoyance of the neighbours trying to get to sleep, with the equivalent of the moon shining through their window😊
Device sharing
Use the ‘Device Sharing’ feature in the ‘Me’ section of the Tapo app, to allow other family members with the app on their smartphones, access to control the smart devices too.
Bulb sunset schedule
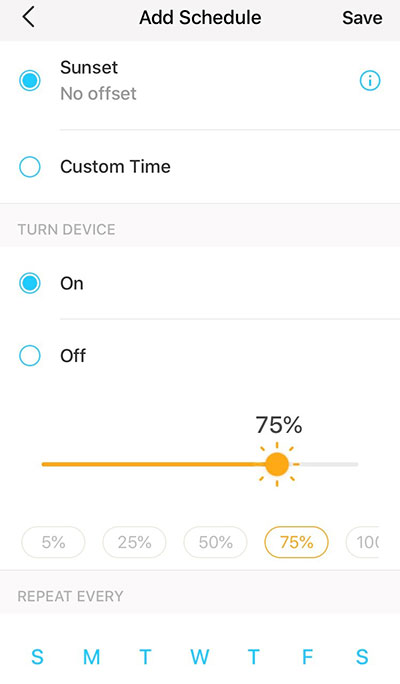 A great feature of the smart bulbs is that they allow you to turn your lights on when the sun is setting! This is also based on your location and actual times the sun sets on a given day. Just open the Tapo app, choose the light you want to access and choose the ‘Sunset’ option. You can also specify the days in which this schedule should happen.
Bulb brightness
If you want some mood lighting, then you can change the brightness of the bulbs in seconds. Just say ‘Alex {light name} 25%’, for some instant ambiance.
Remote access
And finally, because the Tapo app is tied into your Amazon Echo, no matter where you are, whether at work or just away from home for a day, you can still access your devices from your phone. Extremely handy if you want to give the impression that someone is still in the house.
Google Assistant App
There is also another option to access the smart home devices in your home and that is with the Google Assistant app. This app can be downloaded onto your phone for free. Follow the steps below to start using Google Assistant with your Tapo devices.
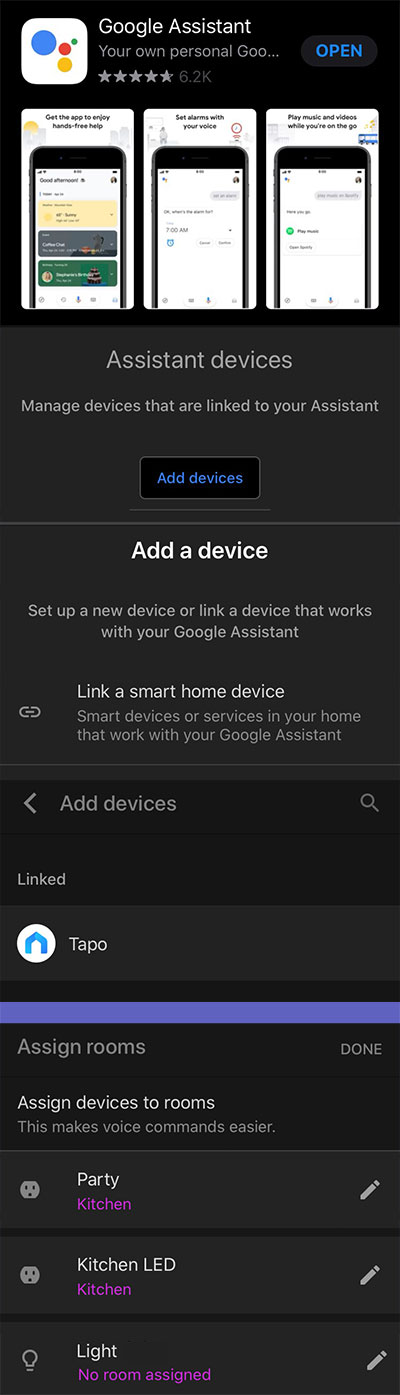
Step #1 – Download the Google Assistant app and install it.
Step #2 – Open the app and sign in with your Google account.
Step #3 – Click on your profile picture in the top right-hand corner of the app and click on the ‘Devices’ option.
Step #4 – Now, click on the ‘Add Devices’ button an choose ‘Link a smart home device’
Step #5 – Scroll down the list and find the ‘Tapo’ icon and agree to link Google Assistant with your Tapo account.
Step #6 – Now, all the devices you setup in the Tapo app, are now available to you. You just need to assign them rooms in Google Assistant and click on the ‘Done’ button. Any new devices that you may add with the Tapo app, will be picked up by Google Assistant. All you need to do is go back to Step #4, find your device in Google Assistant and add them to a room.
Step #7 – To activate the smart devices in your home such as a smart plug or light bulb, just say ’Hey Google, turn on {your device name}’.
The only problem I found with Google Assistant is that there was no easy way to see at a glance, what devices I have installed. The best way to show this is to download Google Home, which shows you all your smart devices and where they are located.