 We offer a comprehensive range of plinths, panels & accessories in cabinet and door material.
Cabinet material accessories are more cost effective than door material accessories but are not recommended/suitable for use with all door styles. Please note: some products are only available in door material.
Video
Planning a new kitchen?
 If you are thinking of buying a new kitchen from DIY Kitchens online then why not take a look at our kitchen visualisation application here.
You be able to see how a new kitchen would look in any of our styles, in the colour that you would like and even paint your walls and choose some flooring to see how your final design would look in your home!
Download our kitchen planner
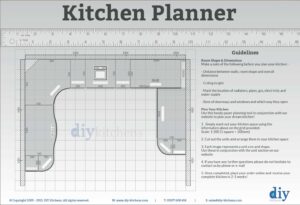 Want to plan your kitchen and create a paper plan mock-up?
Simply download the Kitchen Planner PDFs here and start measuring up slotting units into position.
Don’t forget to plan in your service voids on corner units and think about the space needed for corner posts so that all your drawers and kitchen units can open without any obstructions.
Hi,
If we get the coloured carcasses do we still need end panels? We want Clayton Dove Grey doors and the light grey carcass
Hi Aradhana, the carcases are very similar to the doors but not 100% identical. It would be worth ordering a free door and carcase sample here, so that you can see how they look in the light of day. The “Which Cupboards Need End Panels” article is a good rad on this subject.
We will be installing a freestanding American fridge freezer inbetween two tall larder units. Do you recommend installing end panels to the sides of larder units that will face the fridge freezer?
Hi Rebecca, we recommend cutting a tall end panel in half to use either side of the american fridge freezer. This gives a framed look. Lighting pelmet is always a good product to use either side of the appliance which is 50mm thick, to cover any gaps
I have a walk in larder unit and need to fit a side panel, as at the moment we can just see the carcass material, but this would leave a gap between the original side of the unit and the doors. How do we fit an end panel the side? Also the doors don’t fit together properly. The bottom doors sit slightly under the top doors – are we supposed to join them together somehow as we don’t need a top and bottom door to open independently.
Another problem we have a row of drawer line units going all the way around the kitchen but some of the drawers don’t line up. Is it possible to adjust them in someway so they are all at the same level?
We have also missed off 2 side panels from our order. Are we able to have these delivered or do we have to pick these up?
Hi, the best thing to do is to create a support ticket below and the Aftersales team will be able to help you with all your questions and advise you on ordering your missing items.
https://www.diy-kitchens.com/myorder/
Hi, I am planning to buy Painted shaker style kitchen from your website, and have few questions. I will have dishwasher right at the end and wonder what do I need to get to box it off apart from the end panel. It is fully integrated and I am also ordering the recommended door for the front. Similarly I will have a wine cooler at the other end, so the same question will the end panel be enough.? Another issue with the wine cooler is that it will not be again the wall at the back, so presume I will need another end panel ?
Hi, when using an appliance on the end of a run you will just need to use an end panel to cover the side of the appliance, depending on what the appliance is you may need to use an integrated appliance door, which will attach to the front of the appliance such as a dishwasher, washing machine, dryer, under counter fridge and under counter freezers.
I am in the same position as Natalia – I have an integrated dishwasher on the end of an island. If I were to use an end panel to hide the DWsides, it would break up the plinth run. Is there another way to cover this and keep the bottom edge looking tidy?
Hi, when using a dishwasher on the end of a run, you will need to use a base end panel to cover the side. You will not need to use another base end panel down the inside of the appliance unless you are using two appliances directly next to each other.
For Example
If you are using a Dishwasher then a high line base unit you will only need to use an end panel on the very end of the run, you will not need to use an end panel between the appliance and the unit.
If you are using a Dishwasher then a Washing Machine, you will need to use a base end panel on the very end of a run and down the middle of the two appliances, the only way to get around the end panel breaking the plinth up would be to cut the end panel around the plinth.
Thanks for the reply, but what I meant was the plinth run on the *side* of the dishwasher, not to the front. In a perfect world, the island would have door-matching panels all round, and plinth all round, so it looks seamless. Can this be done?
Hi, the side is what is being referred to. The neatest and recommend method is to put an end panel on the side (or use doors to create a matching look on the sides) and only have plinth on the front run and back run if needed (unless using end panels on the back as well). The image below shows an end panel capping off the end of an island.
For any further clarification, our sales team are available to speak to on 01977 608 418.
Thank you – It’s that look I’m trying to avoid – where the island is just finished with a slab of end-panel down to the floor. I’d like to use a door, so I either need to use a 720h door and then finish off below somehow (hence my question), or find a door that 850ish high. Sounds like it’s too tricky.
A have another finishing-related question please – as you sound knowledgeable! Are the modern cornice pieces finished on three sides… and so it’s just the side with the groove that has exposed MFC?
If you are using slab doors like Luca & Altino then you can order larger doors and cut them down and get the same great effect but if you are using shaker doors then it gets a little harder, as you start to lose the shaker frame top/bottom of the door.
With regards to your last question about cornice, you would be best to speak to our product specialists on 01977 608 418 to get the answer about the finish on the cornice as they have access to the items.
Hi we are currently fitting an end panel to a tall larder unit which will then be attached to a base unit and a wall hung unit. What fittings are used to attach the end panel to the larder unit as I don’t want the screw heads to be visible ?
Hi, we do not supply fittings for fixing the end panels to units. We recommend using screws to fix the end panel to the unit from the inside of the unit, giving a clean finish on the outside pf the end panel, with no visible screw heads.
Hi,
We are putting a range cooker into our island in the middle of the kitchen. It will have a pan drawer behind it and to the left hand side but the right hand side of the range will be at the end of the island. Is it possible to have an end panel and a bottom plinth running along the cupboard that is behind it and the exposed edge of the range? Its a rangemaster so doesn’t have any where to attach the end panel as you would on a cupboard.
Hi, if you send us a detailed plan we will look into getting an answer to your query as it is difficult to imagine without a plan. https://www.diy-kitchens.com/support/new-ticket.asp?enty=16&enht=Other
Hi,
I have a clayton mussel kitchen and am in the process of fitting the pelmets. I have the plain lighting pelmets. These have a square profile with a groove running down the middle. A couple of quick questions:
1. Are these usually fitted flush to the edge of the door or to the edge of the carcass? My end panels are fitted to flush to the edge of the door
2. Which way up do the go? If they’re level with the door then the groove needs to go on the bottom otherwise you’ll see it when the door is open..
Thanks,
Simon
Hi, pelmets sit in line with the carcase, and the groove either sits facing the wall or sits joined to the carcase, depending on which way you use the pelmet.
Morning , I’m fitting wall cupboards up and now have got to fit a spacer panel in between the end of the double cupboard and the half cupboard that goes above the hob.Do I fit it flush to the carcase or do I bring it out I line with the door fronts ,as this I fill would look wrong along the line of the cupboards ????
Hi, it is standard to fit end panels flush with the doors but not obligatory, you can of course finish them flush with the carcase. Fillers would generally be fitted flush with the carcase edge. By making an L shaped filler, they can be made to finish flush with the doors if so desired.
Hi there,
I recently purchased a Broadoak Kitchen, which I am very pleased with and I am at the finishing stages of fitting.
Within the units supplied I have a tall appliance housing unit, for single oven and microwave which is supplied with an additional drawer front for trimming to size as a infill panel above the appliances.
Can you advise on the best way of cutting and finishing.
I’m assuming either router or saw cut with chamfer dressed after cutting, but I’m concerned that I will be left a cut and chamfered edge, untreated whereas the drawer front appears to have a treatment (either lacquer or wax).
Any advice on cutting and finishing treatment would be appreciated
Hi, cut it with either a router or a saw, a table saw would be best to obtain a straight clean edge, then sit the raw edge on top of the appliance so you don’t see the raw edge, you can rub some polish or wax on if you want as long as it doesn’t contain silicone.
HI. can you let me know the measurement of the 900 x 600 inframe base end panel –
depmi. need to work out the total measurement so need to know how thick the wood panel is thanks
Hi, the Harewood and Milton panels are both 19mm thick, if they purchase the door material panels. All carcase panels are 18mm thick.
I have a couple of questions.
1) can you use dark carcasses with White handleless cupboard doors. I am thinking about a tall bank of units in adarker coloured doors than the rest of the units and thought it would tie them in better.
2) do your handleless units need a cornice?
3) can I mix Remo elm cupboards (for tall bank) and Remo gloss for the rest of the kitchen
Hi,
With regards to carcase colour & door combinations like Remo Elm & gloss, you can choose any colours that you want to. A kitchen design is bit like a work of art where you are free to create something completely original and unique to your home. If you have any doubts then we also have a sample service where you can order some door styles and carcase material examples to help you make your choice below.
https://www.diy-kitchens.com/samples/
With regards to cornice on the handless range, cornice and pelmet are completely at your discretion. Have a look at our Luca kitchens in our real customer kitchens section below to see some kitchens with and without it.
https://www.diy-kitchens.com/customer-reviews/
I am thinking about buying a white gloss kitchen but not sure whether to go for an lacquer finish or acrylic, what do you advise ? Also not too sure what end panels I will need. Do I need an end panel for a tall unit if the unit is at the end of the run ? Also wall units do I need decor panels and cornice,plinths for these too.
Hi,
Both the lacquered and acrylic high gloss doors are hard wearing and are really down to personal choice. The page below will give you more information on them.
https://advice.diy-kitchens.com/customer-questions/can-you-explain-what-the-kitchen-door-materials-are/
If you opt for a gloss kitchen then end panels are advised as the units are matt white so you would need end panels either side of your extractor on the wall units, on tall units where the tall side meets a base unit. At the end of a run, you could use some plinth material as a filler.
If available in your door style, decor end panels are optional as too are cornice and pelmet BUT plinth really is essential to cover the legs of the base units.
Hi
I’m looking to have a Linwood painted Microwave/ double oven unit at the end of a run of base units(at an open end) I assume I need full length painted end panels at each side of this unit ?
Also what is the difference between the 2 end panels that are available – I know one is 19mm and the other 25 mm but is there any time it’s more appropriate to use the thicker one ? ( I see it mentions being painted part on the rear face)
Thank you
Hi, yes you will need 2 end panels, the only difference regarding the thickness is that the 25mm ones give the kitchen an inframe look.
Thank you.
So looking at the photo of the oak kitchen above which has 2 end panels- am I right to think these would be the thicker ones ? If the thinner ones were used like this in a painted kitchen you would have the inside section at floor/plinth level that wouldn’t be painted , which would obviously look a bit odd ?
( I hope that makes sense )
Hi,
With the Innova range of kitchens (including Linwood), all our end panels are completely sprayed on both sides. It’s only the Second Natures ones that have a 100mm painted strip on the inside edge, which is enough to go to the floor and any exposed bits from the floor up will have the paint visible.
Hi,
I’m looking into a design of an island to match an existing Milbourne Alabaster kitchen. I’d like to use full depth and shalow base units back to back for an overall island depth of around 900mm. Can you let me know what options there are for covering the end of the island? I see that there are feature end posts available for this style, but from the drawing its not clear to me how these work. Do you have any images of this post or other suggestions on how to hide the joint?
Thanks.
Hi, end panels and feature ends are the main way to cover the end of an island. The page below shows the feature end post and how it fits with an end panel.
https://advice.diy-kitchens.com/customer-questions/tongue-groove-end-panels-radius-feature-ends/
On each side of a Cornell Classic Top Box will be 900mm high units with hinged doors. The Alabaster end panels will be visible. Can I replace these end panels with Cornell Classic panels? What if the hinge side is on this panel?
Hi, the additional door matched panels are planted on to the alabaster carcase sides. You do not have to run the panel up to 900mm height, you can cut the panel to size and run it up to the underneath of the top box. The units are supplied pre built so it is a difficult task, with expertise required, to try and remove the carcase side panel so as to replace with the Cornell panel, which would then require drilling for shelves and hinge plates.
I am not wanting to add any end panels as broadoak doesn’t seem to need them. However I have freestanding appliances so will need to return plinth. I have looked at your info on this but am still wondering how it will infact look. Obviously the front plinth will go edge to edge of the cupboard but be set back a few inches. How will the side return look. Will it sit behind the front plinth and will if be flush with the side of the cupboard or set back? I will also be looking to buy some plinth edging, am I right in thinking I will need approx. 150mm for each edge that shows?
Hi, you have almost answered your own question. Run the plinth under the units and finish level with the end of the last unit. The return plinth fits flush with the side of the cabinet and covers the edge of the long plinth. The return plinth will require edging tape on the front edge to finish off. The plinths that you can use are the carcase material plinths 150mm high to complement your carcase colour.
so looking from the front, the side plinth will be completely stuck out from the side of the unit and would need edging strip on short front edge and top long edge? do you have a picture or diagram to show this?
Here is an example (looks better from the front) of the plinth that is visible to the kitchen running right up to the end of the last unit and the return plinth butting up to the back of the front piece of plinth. In this example, the large piece of plinth is edged on the right hand side. Or, you can cut the large front piece of plinth so that it ends about 18mm from the end of the last unit, and use the return plinth to butt up the side of the front plinth and then edge the front exposed side of the return plinth (looks better from the side). If you have any offcuts of plinth at the moment, just offer them up to the side of the units and see which way you prefer.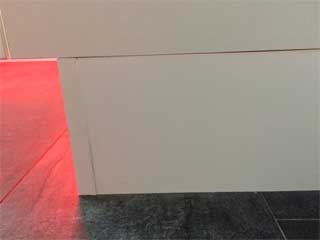
hi there. I have ordered a Luca matt white corner post with my kitchen.
I have gas meter in the corner of the kitchen so i don’t have a true corner unit.
Instead one side is to be a 600mm base unit with door and the other a integrated door on a washing machine. I have approx 30mm space left for the corner post on both runs (i.e in the corner). The corner post is 70mm each side isn’t it? Can this be cut down at the corner and then screwed together to allow this reduction as i have seen some Luca versions with a minimal corner overhang as there are no handle. Hope this makes sense.
Phil
The corner post is 70x70mm. On the handleless ranges we would say that you need “at least” a 25mm corner post, this should not pose any issues and would give you the line to follow with your next door. You can cut it down and this page may be of some use to you.
https://advice.diy-kitchens.com/customer-questions/how-to-fit-a-luca-corner-post/
Here is an example of someone’s corner post that has been adapted and touched up with touch up paint.
Where a run of cupboards meets a wall should I include a filler panel between the last unit and the wall? This would be for a ‘lay-on’ door style kitchen.
Also, for your Broad Oak Natural / Lancaster Oak combination is it recommended to use end panels, i.e. how well do the doors and carcasses match?
Thanks
Where a run of cupboards meets a wall the use of a filler is entirely optional. A filler will reduce the chances of a door handle clashing with the wall. Without a filler, you will become accustomed with the risk of banging the handle on the wall and open the unit appropriately. Handless doors would not have this issue.
Could you also comment on my other query? Thanks
Hi, sorry for missing the other bit off. The Broadoak Natural Door & Lancaster Oak Carcase is a 5* excellent match for the door, you would get away with not using an end panel. If you are using cornice or pelmet though we do advise ordering this in door material. To be 100% sure in your decision, you can order a door and unit sample from the page below.
https://www.diy-kitchens.com/samples/
We are purchasing a mussel Harwood kitchen and wanted to know how filler panels work and if I need them. We want the oven (range style) to be slightly deeper than the rest of the units and wanted to know how we get this effect.
If you want to create the stepped out look they could use radius feature ends, which would give the deeper section a curved look. An example of a Feature Radius End is below.
https://www.diy-kitchens.com/inframe-kitchens/harewood-mussel/plinths-pelmets-cornice/wp2021169/
You would need to use some end panels to slot into the radius feature ends to finish the look off, see an example of an end panel fitting into a radius feature end below.
https://advice.diy-kitchens.com/customer-questions/tongue-groove-end-panels-radius-feature-ends/
Remember to give enough space for the range cooker as end panels are usually around 20mm thick and Gas regulations state that you have to have at least a 20mm gap between gas appliances and combustible materials like wooden kitchen units.
http://www.hse.gov.uk/gas/landlords/1-april-2009-tb-022-installation-of-previously-used-domestic-gas-cooking-appliances.pdf
Hello,
I bought the Cornell Classic units, almost everything has been fitted but cornice panels. Could you advise us please, how the cornice panels should be properly fitted. How to do it? Is any video on your website or pictures with instructions or guides?
I will appreciate your help
Kind regards
Ewa
Hi, there are different style of cornice. Basically they need securing with screws. On the traditional style of cornice there is a flat lip that sits on top of the wall units that you screw through from above. If you do not have enough room at the top of your units to screw down then you can screw up through the carcase but you will see the screw head when opening the cupboard, so be discreet with the screws. An experienced kitchen installer will be able to offer alternative advice depending on your requirements.
End panel problem:- I would like to have the same colour on the inside edge of a run of units that have an oven housing one end, then lower base units and a larder the other end. It appears that the panels may not come long enough. If the oven housing is 2120 tall and the base unit next to it is 720 + 150 legs + 20mm worktop, what length would you recommend I buy please? I’m lokking at Lucca Grey gloss handleless units. Thank you.
Hi, we have end panels which are 2.4 metres tall, see below. These would be what you need and you would need them in door material to match your doors.
https://www.diy-kitchens.com/kitchen-units/plinths-panels-and-accessories/end-panels/
Thank you for that – also if I am putting my freestanding tumble dryer and washing machine between units do they need speial end panels or can they go straight next to the units
Hi, your appliances can go straight into the gaps of the units. As you have gloss doors on the units though, you may be able to see the sides of the units, which are in a matt finish. If the appliances fit quite snug then you might not see much of the sides. Structurally, you do not need to have end panels but some people do put them in for a uniform look.
Please bear in mind that end panels are around 20mm thick, you will need to consider this if you do use them as you’ll need to make sure the gap between your units is big enough to accommodate the appliance.
I am interested in the luca white gloss kitchen I am planning for a complete wall to wall run of floor to ceiling units with my existing amrican fridge freezer in the centre. If the larder cabinets run wall to wall do I need to allow a gap at each end to accomodate the doors and if so do I need fillers at the end. Also on the luca cabinets do the ends match the doors or do I need special end panels.
Hi, it would be best to leave a gap at each end of the run. To make fillers, you can just order an extra length of plinth as this would match your door. With a gloss, you would need end panels as the units are finished in a matt finish.
Is there a video for fitting cooker hoods
I’m sorry but we do not have any videos on fitting cooker hoods.
Hi
Can you tell me if base end panels are needed either side of a free standing cooker or is the cabinet end sufficient?
Thanks
Hi, there is no set rule as it is personal preference really, as you only see the front edge and a little bit on the side. If you don’t want any end panels, you will have to return the plinth down the sides or cut it as near to the cooker as you can.
I’m a little worried about chipping or cracking the acrylic on Altino White end panels when I cut them to size. Is any special technique or tool required or would a jigsaw or circular saw be ok?
Hi, the process of cutting acrylic is with a fine tooth saw (preferably at the highest speed possible) for further info refer to websites such as https://www.diydoctor.org.uk/projects/cutting_and_drilling_acrylic.htm
Staying on the subject of end panels how & with what type of saw (hand /jig?) do you recommend Luca Gloss panels are cut to size to minimise the risk of damaging the surface?
Hi,
A jigsaw with a new blade would be fine, alternatively a router would be good. Place some masking tape down first to help prevent any splintering.
I have a number of cabinets where I need to attach finished end panels on my Luca White Gloss kitchen which is currently on order. Can these panels not be incorporated into the original construction of the cabinets so that there is no additional protusion beyond the line of the cabinet. Failing that, is it recommended that the front edge of the finish end panel is flush with the front face of the cabinet or can it protrude so that it is flush with the front face of the door?
Hi,
With regards to your question, unfortunately we are not able to incorporate the panel into the original construction of the units.
What you would need to do is as follows.
Request the unit dry assembled
Take off the blanking panel
Attach your end panel
In answer to your other question, it is recommended that the front edge of the end panel be flush with the doors.
I have all but completed my order for a Livorna White kitchen but I am confused by the end panels.
Is a decorative end panel used to replace the exposed carcase panel of a unit or is it simply attached on the end?
If it is a replacement presumably any hinge fitting cutouts will need to be made in the panel.
If not a replacement what do you do about the extra 18mm face exposed at the front?
Hi,
A decorative or standard end panel is used at the end of an exposed unit, only if the unit colour does not match or fit well with the current door colour. End panels are not always needed. There are no hinge fittings on end panels and the edges are all finished and match the colour of your doors.
I hope this helps.
Hi, I am trying to plan an inflame kitchen and am not sure what pull out accessories I would need to order. i know that the aperture for in frame doors is smaller than for doors which aren’t in frame so I am guessing that pull out larders , wire trays etc would need to be ordered smaller than usual? Is there a guide anywhere on your site?
Thanks
Hi,
A very good question and the quick answer is that you can order any pull out accessories/mechanism that you want. I created this page for you below which answers your question in more detail.
https://advice.diy-kitchens.com/customer-questions/pull-wirework-mechanisms-can-use-inframe-kitchen/
I am looking to put a unit then a free standing washing machine then a unit again. I am told I need end panels as well as the units to hold up the laminate over the washing machine. Is this correct. what is the difference between your base end panel and the Malton base end panel
Hi,
If your kitchen units match the colour of your doors then no end panels would be needed. If the kitchen units are a different colour to the doors then some people fit end panels to give a uniform look to the kitchen. If your washing machine fits snugly into the gap then it really is your choice if you want end panels in there or not as you would never see the sides of the other units.
With regards to the worktop, the units would hold the weight of the laminate worktops and this weight is distributed across them all, so adding 2 thin end panels to take the weight of the laminate is not really going to help that much.
With regards to your other question, end panels are sometimes available in door material and carcase material. The recommendation on which one to use is shown on the page.
I hope this helps
Im just about to order my kitchen, but the end panels are confusing me…
What size would i order for the standard base unit size H 720mm D 560mm Legs: 150mm
Also for the wall units i’m ordering (horizontal bi-fold H 720 D 300mm)
Thanks
Hi, the end panel for a standard unit always comes a little larger, so that it can be cut down to fit your kitchen perfectly. The size of a standard base unit end panel would be 900mm x 600mm. Please note that end panels are available in door and carcase material. Please ensure you choose the correct end panel so that they match the finish of the doors.
I am trying to order an inflame kitchen – oak carcass and all white 2005 painted doors.
1. I need an oven housing for a 60×60 single oven and 450×60 combo oven and cannot identify the correct size as the web site does not break down product sizes (e.g. bottom door, top door, aperture size) which should I be purchasing?
2. If I order standard plinths etc in white how well will they match the doors?
Terry
Hi,
The oven housing is under the base units section and is right at the bottom of the page. An example of a Milton oak unit is here: https://www.diy-kitchens.com/inframe-kitchens/milton-oak/base-units/milton-oak—600mm-built-under-oven-housing/wp1009445/
With regards to the 450×60 combo oven, you would need to give us a call on 01977 608 418 to see if a unit can be made/modified to your requirements on that one.
If you order the plinths etc in door material then they will be a perfect match with the doors.
Hi,
I am planning to put a tongue and groove end panel (EOGP24) at the end of a run of base units. I have seen your feature radius end panels (EOBFEP890) and wondered whether they would be suitable to use to help finish the tongue and groove end panels?
Hi,
Good question. I just spoke with the Sales Manager and he said yes, you are correct. The (EOBFEP890) panel can be used to finish the tongue and groove end panel. We will try and get this question turned into and article on here very soon to help visualise this better.
Great! Thank you for your help!
How good a match are the shelley stone grey cabinets and doors? Will the plinths/ panels be ok in the cabinet colour?
Hi Rose,
The cabinets and doors are a great match but we recommend you buy your plinths in Door Material to exactly match the finish of your chosen door style. There is a small orange (D) in the corner of the boxes that shows which items are made from door material as shown on the page below.
https://www.diy-kitchens.com/kitchen-units/plinths-panels-and-accessories/plinths/
I hope this helps.
Are the Shelley kitchen doors in-frame and what are they made of? I couldn’t find them in the sample list.
Hi there,
Shelly doors are an imitation in-frame and are vinyl wrapped MDF.