 This video shows our in-house kitchen fitter fitting a complete Abbey kitchen in our Pontefract showroom. Get some tips from this video if you are planning on installing your own kitchen.
Download our technical fitting guide
Video
Planning a new kitchen?
 If you are thinking of buying a new kitchen from DIY Kitchens online then why not take a look at our kitchen visualisation application here.
You be able to see how a new kitchen would look in any of our styles, in the colour that you would like and even paint your walls and choose some flooring to see how your final design would look in your home!
Download our kitchen planner
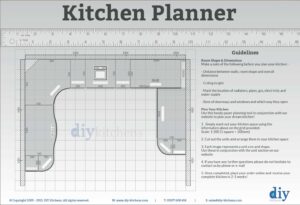 Want to plan your kitchen and create a paper plan mock-up?
Simply download the Kitchen Planner PDFs here and start measuring up slotting units into position.
Don’t forget to plan in your service voids on corner units and think about the space needed for corner posts so that all your drawers and kitchen units can open without any obstructions.
Download our mobile app
Looking for some kitchen inspiration? Take a look at some of our real customer kitchens, video reviews as well as advice in our mobile app. We’ll also keep you up to date with any new ranges and offers that we have available.
Up to 50% off competitor kitchen prices
At DIY Kitchens, not only do you get a quality rigid built kitchen but you also get it at a fabulous price too! Price your kitchen up on our site and you could see savings of up to 50% off other kitchen quotes that you’ve had.
Take a look at our kitchen price comparison page here.
Real customer kitchens
Get some inspiration for designing your own new kitchen with over 3,000 pictures of our customers’ kitchens that they ordered from us.
Do you have any instructions on fitting LED LARDER SENSOR LIGHT KIT please?
Hi, we have nothing on our website for this. There is usually some instructions inside the products though. If you need any further advice on this then our sales ream may be able to help on 01977 608 418.
Hi, looking for instructions on how to adjust the height of the 150mm Wire Basket pull out units. I have two, found 3 adjustments on base part, can see one adjusts left/right but unsure on other two, please clarify, thanks.
Hi, this image shows how to adjust the unit. If you need any further assistance then our sales team will be able to help on 01977 608 418.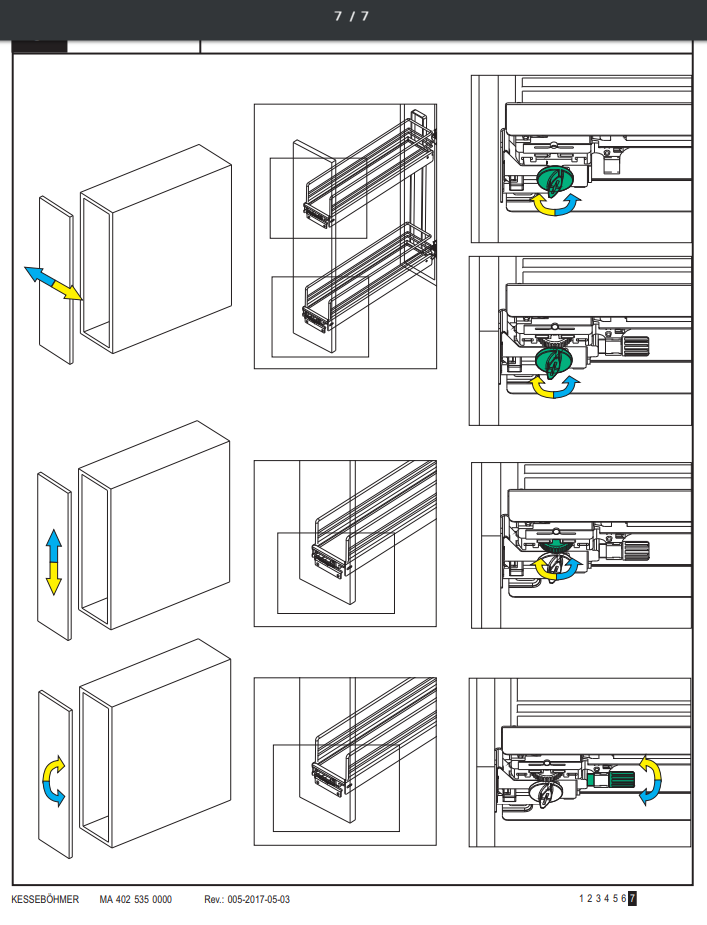
Hi do you have a guide that shows how to fit the soft close Blum hinges please
Hi Angie, there is no guide but take 1 of the the soft close mechanisms to clip on the hinges. Line it up so that the grey bit that retracts is facing you, position the soft close bit so that the small clips on it, fit into the hole in the hinge. Then, using your thumbs, push a little on the front with one thumb then push down hard with the other thumb at the back. That should do the trick!
Hi, How do you fix a tall oven housing with a tall end panel attached to the drawers next to it as the fixings provided are for two thicknesses and not three.
Thanks
Colleen Bradley
Hi Colleen, we recommend using screws to fix the end panel to the unit from the inside of the unit, giving a clean finish on the outside of the end panel, with no visible screw heads.
Very pleased with cabinets but the vertical adjustment for wall cupboards is awful. Moving the teeth takes an age and moving it far enough to engage the next tooth almost impossible. No wonder the tech guide and video help show nothing
Hi,
We have a kitchen fitter who is not the most competent. We can’t easily sack him as he comes with our builder. On his first attempt to fit the lighting pelmets he cut down the cupboard end panels and them screwed the pelmets side on to the front edges of the cupboards. We have now received from you new end panels and pelmets but our fitters original reaction was that he had always fitted the pelmets that way and knew of no other. Have you a simple tip for a very simple man as to the fitting of lighting pelmets on a shaker kitchen.
Hi, the side panels are 772mm high, so if you drop the panel 50mm lower than the bottom of the carcase, so that it overlaps at the bottom by 50mm, the pelmet on its 50mm side will literally just butt right against the side panel and the top of the panel just needs to be trimmed, so it is level with the top of the cabinet and then the cornice would be mitred. We do advise to recess the pelmet so it runs in line with the cabinet and use small L brackets on the reverse to secure.
Hi There
Due to the configuration of our kitchen, and the positioning of our windows, we really need a 1000mm sink base unit. However, we are having a belfast sink, and cannot find a base unit any bigger than 800mm – do you not do the 1000mm and if not how could we get around this?
Thanks in adv.
Hi, sorry but the biggest Belfast unit we do is 800mm wide. Could the units either side be made bigger to accommodate this?
Hi,
Do you have any advice for fixing end panels? I can’t see them in the video and they aren’t mentioned in the downloadable guide.
Thanks,
Felicity
Hi, the end panels are just screwed in from the inside of the kitchen units.
Hi,
I am planning a peninsula that is 3.3m long and 900mm deep…. I am having quartz worktop….. Will I need to fix the peninsula to the floor……? And what is the best way to do this is if nescessary…..?
Also what is the best fixings for fixing base units together?
Thanks
The best way to attach the units to the floor is by fixing the end panels and the peninsular backing to the floor with either L-brackets or timber.
The cabinets are fixed together with cabinet connectors, which will be supplied with the kitchen.
That’s cool, however I don’t have any backing as I have units back to back…….will fixing just the end panels be enough? Also I was planning to fix end panels once new flooring had been laid, is it better to fix to floor as one piece and then cut flooring around the end panel?
Thanks
Hi, once everything is in place and fixed together, especially with the heavy quartz worktops on top, the island is not going to move, but to be sure, securing the end panels with prevent any minor movements.
I need to leave a service gap for pipes behind the base units. I am thinking of using a 620 deep worktop and placing the units against a 40 thick batten screwed to the wall to create a service space. Given this space it is advisable to have a rear panel to stop things falling into the gap. Do the base units come with a rear panel fixed in place? It would be useful to have a removeable panel for access to the pipes. Any advice would be welcome.
Hi, all the base units have a back panel that is slide in. Once your worktops are in place, there is no way to remove the back panel I’m afraid.
Hi.
We are getting ready to order our new kitchen from you. We have decided upon Broadoak Natural and have sent for a door sample just to confirm our choice. We only have a very small kitchen and want to maximize the space as best we can. The only place we have been able to locate ‘plinth drawers’ is at Howdens. It seems like such a great idea when space is limited. Is this something that you could assist with as part of our order?
Thanks
Gill
We do not supply plinth drawers and due to our carcase legs having a larger radius than Howdens’, I would say the plinth drawers they supply would not be compatible.
How do you remove the drawers?
Hi, start with the top drawer, pull it fully out, lift up the front and it rises up, then pull up from the middle of the draw and bring the back level, then just pull up and out.
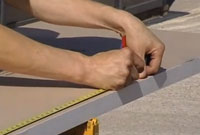
AT 2 mins 12 secs into this video – https://advice.diy-kitchens.com/video-help/kitchen-fitting-video/ – you see the fitter cutting a piece of wood which is used to fill in the gap between the last unit and the wall.
What item should I buy for this?
I’m looking at getting a Carrera Painted Alabaster kitchen so would you recommend door finished or unit coloured for this item?
We would advise using plinth as the filler, so if you order enough plinth for the entire kitchen and possibly an extra length to be cut down and used as fillers. With the Carrera being a matt smooth painted door, you would be able to use the cheaper carcase material plinth if you wished to do so.
Are the hangers on the wall units adjustable – up/down in/out? Can’t see how to adjust them.
Also please confirm the distance of the screw holes for the wall brackets from the top of the unit – looks to be 3cm?
Hi,
The wall plates are adjustable up/down and in/out, the centre screw adjusts the tilt on the unit and the screw below adjusts the unit up/down, the wall plates are set down 40mm from the top. This page may be able to give you more advice as well. https://advice.diy-kitchens.com/customer-questions/wall-unit-fitting-adjustments/
i see that the units are screwed to the wall at a slight angle. How do you suggest doing this? Do I need to purchase an l shaped bracket to assist with this?
Also, how do you recommend fixing wall units to a plasterboard wall?
Hope you can help!
Hi, if you go to page 12 of the PDF below (Wall Unit Fitting) you will see the large rectangle brackets that are already attached to our wall units. There are also separate wall hanging plates (also supplied) that you attach to your wall that allow the units to clip onto them.
https://advice.diy-kitchens.com/wp-content/uploads/2013/05/tech-guide-combined-version-2-nov-2012.pdf
I meant the ground level units. Sorry didn’t make it clear!
Hi, If you have single units on their own then it may be a good idea to fix these to a wall for extra rigidity (the units go flush to the wall and you would need angle/l shape brackets). If you have a run of 3 units then fixing to the wall is optional as the units will all be connected together and the strength and rigidity will come from the connection and also the worktop weight holding them down as well.
Example bracket holding a unit in place.
Hi, i am a little confused. The cabinets are 560mm deep with i asume an 18mm door = 578mm but your work tops are 670 mm wide leaving around 92mm left over. I noticed that your video shows cabinets screwed back to the wall with no service gap. What happens to the remaining 92mm? or has this to be cut off.
Hi,
The worktops are available in depths of 600mm, 620mm, 720mm , 900mm & 960mm depending on the worktop type and style that you choose.
I’m planning a central island of approximately 900mm x 1200mm with an inset hob. I’ve not chosen my door style yet but would appreciate suggestions of which cabinets, and how many, would suit.
Hi,
Designing a kitchen island does present you with a multitude of choices based on what the person wants to use the island for. Based on your measurements, the bare minimum you are going to need is shown in the diagram on the page below but you need to take away the 4 150mm wide units to match your measurements.
https://advice.diy-kitchens.com/customer-questions/design-island-feature/
Here are some links to some other example kitchen islands on the advice section that may help you.
https://advice.diy-kitchens.com/customer-questions/create-kitchen-island-breakfast-bar/
https://advice.diy-kitchens.com/customer-questions/how-do-i-plan-a-kitchen-island/
How to fit an undermount sink 800 unit, sink one and a half bowls,( 598mm) next to a wall with black granit worktop, What space needs to be left near the wall ,and the support for the sink? also how to adjust Bi Fold Doors to stay open Regards Hope you can Help Us
Barbara Harrison
Hi,
The people fitting your granite will send out some people to create a template for the cutting of the granite. If you let them know what sink you are having and where it will be positioned then they make sure it fits. Just make sure you have a sink base unit here and you should be fine